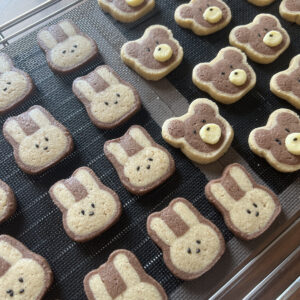
Bear and Rabbit Icebox Cookies
TOO CUTE TO EAT is another name for these bear and rabbit icebox cookies! The chocolate and vanilla flavors are elevated by the butter flavors in this crispy cookie. If you keep the dough for these in the freezer, they will be ready to eat when that cookie craving hits.
Ingredients
Ingredients:
- 100 g Unsalted butter bring to room temperature
- 70 g Granulated sugar
- 1 egg yolk
- Vanilla extract/vanilla bean paste
- 150 g Cake flour
- 5 g Cocoa powder
材料
- 100 g 無塩バター(室温に戻す)
- 70 g グラニュー糖
- 1 卵黄
- バニラオイル・バニラビーンズペースト
- 150 g 薄力粉
- 5 g ココアパウダー
Instructions
Directions:
- Whip the butter using an electric mixer until fluffier and a little lighter in color.
- Add in the sugar and whip together with the butter.
- Add the egg yolk and vanilla into the butter mixture and mix until just combined.
- Sift in your cake flour and fold into the butter mixture.
- Weigh your dough and put half into a separate bowl.
- Sift in the cocoa powder into one of the bowls and mix until fully combined.
- Measure out the dough in to the ear, face, outer layer and extra pieces (ex: chocolate square piece between the rabbit ears, bear snout piece).
- Roll out the dough and shape into the bear and rabbit shapes (freeze for a bit before putting the outer layer on to make this next process earlier).
- Roll out the outer layer into a 12cm by 14cm rectangle and wrap around the cookies.
- Let the cookies rest in the freezer for 30 minutes or the fridge of 1-2 hours.
- When you are ready to bake your cookies, preheat your oven to 170C or 340F.
- Slice your cookies into 12 - 13 cookies and lay onto a baking sheet lined with parchment paper (if you have a Silpat that is grid-like and allows the butter to fall through, it makes a crispier cookie compared to baking it on parchment paper!)
- Place black sesame seeds onto the cookies to create your desired facial expressions using a toothpick and a little water.
- Bake the cookies for 16-18 minutes before the cookies get too brown.
- Transfer the cookies onto a cooling rack and let it cool to room temperature.
- Itadakimas!
指示:
- 電動ミキサーを使ってバターをふわふわになり、少し色が軽くなるまで泡立てます。
- 砂糖を加え、バターと一緒に泡立てます。
- 卵黄とバニラをバターの混合物に加え、よく混ぜ合わせます。
- ケーキ粉をふるい入れ、バターの混合物に折り込むように混ぜます。
- 生地を計量し、半分を別のボウルに移します。
- もう一つのボウルにココアパウダーをふるい入れ、完全に混ざるまで混ぜます。
- 生地を耳、顔、外側の層、追加の部分(例:ウサギの耳の間のチョコレートの四角い部分、クマの鼻の部分)に分けます。
- 生地を伸ばしてクマやウサギの形に整えます(次の工程をスムーズにするために、外側の層をつける前に少し冷凍しておくと良いです)。
- 外側の層を12cm×14cmの長方形に伸ばし、クッキーの周りに巻きます。
- クッキーを冷凍庫で30分、または冷蔵庫で1-2時間休ませます。
- クッキーを焼く準備ができたら、オーブンを170℃(340℉)に予熱します。
- クッキーを12-13枚にスライスし、クッキングシートを敷いたベーキングシートに並べます(シルパットを使うと、バターが落ちてよりカリッとしたクッキーが焼けます)。
- 黒ゴマを使ってクッキーに顔の表情を作りたい形に配置し、つまようじと少しの水を使います。
- クッキーが焦げすぎないように、16-18分焼きます。
- クッキーを冷却ラックに移し、常温まで冷やします。
- いただきます!