Shiso leaf, bacon & cheese epi bread
This Shiso Leaf, Bacon & Cheese Epi Bread is delightfully crispy on the outside and satisfyingly chewy on the inside, with savory bacon, melty cheese, and aromatic shiso in every bite. I’ll show you how to hand-knead the dough so you can enjoy this flavorful, bakery-style bread fresh from the oven—golden, warm, and full of character.
Equipment
- Tools:
- 2 big bowls
- 1 spatula or wooden mixing stick
- 1 scraper
- 1 water measuring cup
- 1 thermometer (highly recommended)
- Rolling Pin
- Parchment paper
- Baking tray
Ingredients
Ingredients:
Bowl A:
- 160 g bread flour
- 40 g cake flour
- 3 g yeast
- 1 tbsp sugar
- 110 g water
Bowl B:
- 160 g bread flour
- 40 g cake flour
- 1/2 tsp salt
- 110 g water 41-42 degrees Celsius — like a warmer bath water. If it’s too hot for your hand to go into it, it will be too hot for the yeast!
Filling ingredients:
- Bacon
- Shiso leaf or basil if you only have that
- Shredded cheese
Instructions
Instructions:
- Prepare the ingredients in your Bowl A and Bowl B — I recommend measuring out the flour first before measuring out the yeast, sugar, and salt. Also, placing the yeast and the sugar next to each other in Bowl A will help get the yeast reaction going quicker!
- Warm up your water until it is a warm bath water temperature (if it is too hot for you to touch, then it will be too hot for your yeast and could impact the way your bread rises) and then add it into your Bowl A over the yeast and sugar first.
- Mix Bowl A until all of the flour clumps are gone — you can mix pretty vigorously here!
- Add in Bowl B and mix together until a dough clumps forms. I recommend scraping it against the sides of the bowl to get all of the flour off of the sides!
- Once you have a dough bowl, flip it out onto a clean surface and we can start to knead the bread! Watch the video to see the different ways I like to knead the dough — vertical, sliding, lift and drop — all ways to warm up the dough and get a smooth surface.
- If your dough passes the window pane test (the test where you stretch the dough slowly with your fingers and see if it can stretch to be thin enough to see slightly through it without the dough ripping) then it is ready to proof!
- 1ST PROOFING: Cover your bowl in plastic wrap and let it proof until it doubles in size. If you are proofing at room temperature, it could take 45 minutes to an hour. I like to proof it at 35 degrees celsius (or in an oven with the light on) for at least 30 minutes or until the dough doubles in size!
- Once your dough has completed it’s first proof, you can flip it out onto a clean surface again and measure how much the dough weighs. Then, cut it into 8 even dough bowls and roll it back up into a smooth ball and pinch the bottoms and place it bottom down under a moist towel to let it rest for another 10 minutes. This step is to allow the dough to rest a bit after you removed the air while cutting it into the dough balls.
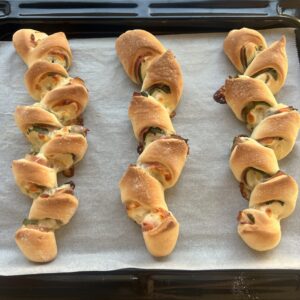
- After 10 minutes, take the first dough ball you cut and shaped and roll it out into a 12cm by 18cm rectangle (it does not have to be exact but I recommend getting as close to this size as you can to make sure you get fairly even sized epi breads at the end!)
- Once your dough is in a rectangle shape, place your bacon in the bottom middle of the dough, place 2-3 Shiso leaves (or basil if you only have that!) and sprinkle on a line of shredded cheese.
- Roll up your dough from the bottom and pinch the edges together to make sure the dough doesn’t unroll while you are shaping it or baking it! Do this for all other 7 dough balls.
- Once you have shaped all of the dough balls into sticks, take extra bread flour and lightly brush the outside of your dough sticks with flour (you can use your hands) to make sure the dough doesn’t stick to the baking tray. Avoid putting too much flour on the part where you pinched the dough together for risk of it unraveling while it bakes.
- Make sure the pinched side is on the bottom and take your scissors at a diagonal angle and cut 4–5 pieces — BUT NOT ALL THE WAY THROUGH! This is to make sure you have a piece of the dough that is still sticking to the main part to be able to slightly shift each piece onto opposite sides of each other (watch my video if this description is confusing!)
- Place your shaped epi breads onto a baking tray lined with parchment paper (you may need to use two baking trays depending on how large your oven is)
- 2ND PROOFING: Cover your dough with a moist towel and a large piece of plastic wrap and let it proof at 40C or 100F for 15-20 minutes or until your dough gently puffs up. If you are proofing at room temperature, it could take 30-40 minutes. (Depending on how long it takes for your oven to get to 220C or 425F, you can begin to preheat your oven here!)
- Once your bread dough has gone through the 2nd proofing, bake between 14-18 minutes or until your bread is golden brown. If your oven is stronger and you notice your bread browning faster, you may end up taking it out closer to 14 minutes.
- Transfer your bread onto a cooling rack once it has finished baking and let your bread cool a bit (but enjoying while it is still warm is highly recommended!) Itadakimas!!